Battery switch on travel trailer function is crucial for managing power sources and keeping your RV running smoothly. This guide dives into the hows and whys of your travel trailer’s battery switch, covering everything from basic operation to advanced troubleshooting. We’ll explore different switch types, wiring configurations, and safety precautions to ensure you’re comfortable and confident managing your RV’s power.
Get ready to become a battery switch expert!
Understanding your battery switch is key to preventing electrical issues and maximizing your RV’s battery life. We’ll cover how to correctly operate the switch, troubleshoot common problems, and even delve into the specifics of different battery types and their compatibility with your system. By the end, you’ll have the knowledge to confidently handle any battery-related situation on the road.
Battery Switch and Deep Cycle Batteries: Battery Switch On Travel Trailer Function

A battery switch is a crucial component in many travel trailers, allowing you to easily switch between different power sources, like your main house batteries and a charging source from your tow vehicle or shore power. Understanding how it interacts with various battery types is key to maximizing your battery life and ensuring reliable power on the road.Properly using a battery switch with deep-cycle batteries is essential for extending their lifespan and preventing premature failure.
Deep-cycle batteries, unlike starting batteries, are designed for sustained discharge and recharge cycles, making them ideal for powering appliances in your RV. However, different types of deep-cycle batteries have varying sensitivities to charging methods, and using a battery switch improperly can significantly impact their performance.
Battery Switch Functionality with Different Battery Types
A battery switch allows you to isolate or connect different battery banks. With flooded lead-acid (FLA) batteries, you’ll need to ensure proper ventilation due to gas emission during charging. AGM (Absorbent Glass Mat) batteries are sealed and maintenance-free, simplifying the process. Lithium batteries offer the highest energy density and require specific charging profiles to prevent damage – often needing a dedicated charger or sophisticated charging algorithm within the switch itself.
Okay, so you’re wondering about your travel trailer’s battery? Knowing how to use that battery switch is key! Check out this helpful guide on the battery switch on travel trailer function to understand the basics. Then, for more in-depth info on managing your power, including troubleshooting tips, dive into this other resource about the battery switch on travel trailer function – it’ll really help you keep your lights on and your appliances running smoothly.
Seriously, understanding your battery system is a game-changer for happy travels!
Using the wrong charging settings with a lithium battery can be disastrous, potentially leading to fire or explosion. A battery switch designed for FLA batteries might not provide the appropriate voltage regulation for lithium batteries. Similarly, a switch optimized for lithium might not be suitable for FLA or AGM batteries without causing problems. Always check the switch’s specifications to ensure compatibility.
Proper Charging Procedures with a Battery Switch, Battery switch on travel trailer function
Charging procedures vary significantly depending on battery chemistry. Flooded lead-acid batteries benefit from a three-stage charging process: bulk charging (rapid charging to roughly 80%), absorption charging (slower charging to full capacity), and float charging (maintaining full charge). AGM batteries generally follow a similar process, but often tolerate slightly higher charging voltages. Lithium batteries, however, require a more sophisticated charging profile, typically involving a constant current phase followed by a constant voltage phase, and often a lower voltage float charge.
A poorly designed battery switch may not accurately provide these nuanced charging stages, potentially leading to premature battery wear. Always consult your battery manufacturer’s recommendations for optimal charging parameters. For example, overcharging lithium batteries can severely shorten their lifespan and even pose a safety risk.
Effects of Overcharging and Undercharging
Overcharging any battery type generates excessive heat, leading to electrolyte loss (in FLA batteries), internal damage, and reduced lifespan. With lithium batteries, overcharging can cause thermal runaway, a dangerous condition that can lead to fire. Undercharging, on the other hand, leads to sulfation in FLA and AGM batteries, reducing their capacity and ultimately shortening their lifespan. For lithium batteries, consistent undercharging can damage the battery cells and reduce their overall performance.
The battery switch itself is generally not directly damaged by overcharging or undercharging, but incorrect charging can severely shorten the life of the batteries it’s managing, rendering the switch somewhat useless.
Okay, so you’re wondering about your travel trailer’s battery, right? First things first, understanding the battery switch on travel trailer function is key to keeping your lights and appliances running smoothly. This switch basically cuts power to your house batteries, preventing drain when you’re not using the trailer. Check out this other resource for more info on the battery switch on travel trailer function ; it might explain things a bit differently and help you grasp the concept fully.
Knowing how to use this switch properly will save you from a dead battery and a whole lot of frustration!
Selecting an Appropriate Battery Switch
Choosing the right battery switch depends primarily on the battery bank’s capacity (measured in Amp-hours, Ah) and type. Higher capacity battery banks require switches with higher amperage ratings to handle the current flow during charging and discharging. The switch must also be compatible with the battery chemistry. For example, a 100Ah lithium battery bank would require a switch with a higher amperage rating than a 100Ah AGM bank, and the switch itself would need to be designed to work with the specific voltage and charging characteristics of lithium batteries.
Always verify the switch’s specifications against your battery bank’s requirements to ensure safe and efficient operation. For instance, a switch rated for 100 amps might suffice for a small system, but a larger RV with many appliances might necessitate a switch rated for 200 amps or more.
Visual Representation of Battery Switch Systems
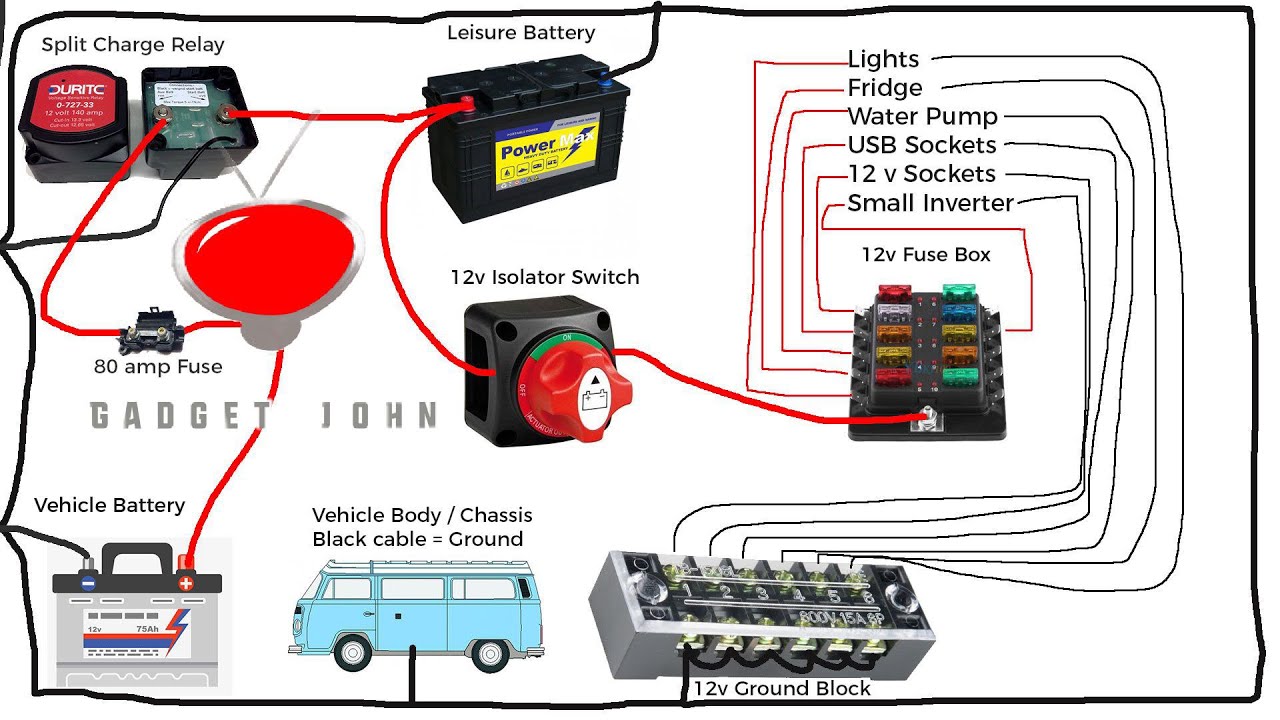
Understanding how your travel trailer’s battery system is wired is crucial for safe and efficient power management. A visual representation helps clarify the functionality of the battery switch and its role in directing power. This section will detail a typical setup and the visual cues to look for.
A typical travel trailer battery switch system involves several key components working together to manage power from your batteries to the trailer’s electrical system. The visual appearance and function of these components are important to understand for troubleshooting and maintenance.
Typical Battery Switch Setup and Component Descriptions
Let’s imagine a common scenario: a travel trailer with two deep-cycle batteries and a battery switch. The diagram below, while not an actual image, describes the setup. Imagine a box (the switch) with several large terminals on it. Wires connect to these terminals from the batteries and the trailer’s electrical system.
The visual appearance varies by manufacturer, but generally, the switch is a sturdy metal box, often black or gray, with clearly marked terminals. The terminals are usually large, heavy-duty, and clearly labeled.
- Battery 1 (House Battery): This battery primarily powers the trailer’s interior lights, appliances, and other 12V systems. It’s usually the larger of the two batteries.
- Battery 2 (Starting Battery): This battery solely powers the trailer’s tongue jack motor and other starting functions. It’s often a smaller, higher-CCA battery.
- Battery Switch: This is the central control point, allowing you to select which battery (or both) powers the trailer’s 12V system. It typically has three or more positions, clearly marked.
- Positive (+) and Negative (-) Cables: Heavy-gauge cables connect the batteries to the switch and the switch to the trailer’s 12V system. They are usually red (positive) and black (negative).
- Trailer’s 12V System: This is the distribution point for the power from the selected battery(ies). It usually connects to a fuse panel or breaker box.
Battery Switch Positions and Power Flow
The positions of a typical three-position battery switch dictate the flow of power. Understanding these positions is vital for safe operation and efficient battery usage.
Imagine the switch has three positions: “Off,” “Battery 1,” and “Both.”
- “Off” Position: In this position, all power is disconnected from the trailer’s 12V system. No power flows to the trailer from either battery. Visually, nothing is happening, and the switch is clearly in the “OFF” position.
- “Battery 1” Position: In this position, only Battery 1 (the house battery) powers the trailer’s 12V system. Battery 2 is completely isolated. Visually, the switch is clearly indicating “Battery 1,” and only the wiring connected to that battery is active.
- “Both” Position: In this position, both Battery 1 and Battery 2 power the trailer’s 12V system, effectively combining their power. Visually, the switch clearly indicates “Both,” and you can see the connections to both batteries are live.
Mastering your travel trailer’s battery switch is about more than just flipping a lever; it’s about understanding your RV’s power system and ensuring safe and reliable operation. From selecting the right switch for your needs to troubleshooting minor issues, this guide provides the essential knowledge to keep your adventures powered up and your worries down. Now get out there and enjoy the open road!
Answers to Common Questions
What happens if I leave my battery switch in the “off” position for an extended period?
Leaving the switch off for a long time won’t damage the switch itself, but it prevents charging your house batteries. This could lead to a dead battery if you haven’t disconnected the battery’s negative terminal.
Can I use a battery switch with any type of battery?
While most switches work with various battery types (flooded, AGM, lithium), some lithium batteries require specific charging profiles. Check your battery and switch compatibility before connecting. Using an incorrect switch can damage your batteries.
My battery switch is making a clicking noise. What’s wrong?
A clicking sound often indicates a problem with the switch itself or a low battery voltage preventing it from engaging. Check your battery voltage and consider replacing the switch if the problem persists.
How often should I check my battery switch and connections?
Regularly inspect your battery switch and connections (at least annually, or more often if you frequently use your RV) for corrosion, loose wires, and any signs of damage. Tighten connections and clean any corrosion as needed.
